MY LEARNING LOG WEEK 9: First Time with Adobe Captivate
WEEK
9
First
Time with Adobe Captivate

To create CAI, we use a program
name ‘Adobe
Captivate’. Adobe Captivate
is an authoring tool that is used for creating eLearning content such as
software demonstrations, software simulations, branched scenarios, and
randomized quizzes in Shockwave Flash and HTML5 formats. (Wikipedia)
Adobe Captivate is a program
for creating interactive learning materials similar to Autoware
combined with Flash, but has been simplified by creating interactive
learning materials. Slides to design and have a Timeline to run the story. In
addition, scripts can be inserted to enable interaction, just like Flash
programs.
The First Screen of Adobe Captivate 9
First screen component when opening Adobe
Captivate 9 program, there will be a format of the project we
can use in order to be able to create jobs as needed more quickly like the
follow picture.

Adobe
Captivate 9 Window and Workspace
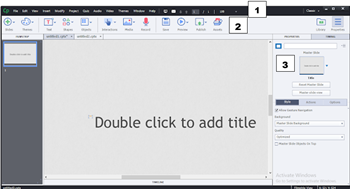
1. Menu Bar
- File: It is for creating/opening new files, saving,
printing, exporting the file.
- Edit: It is for copying, pasting images, text or
slideshows as well as the configuration of the program.
- View: It is the view of the screen or adjusting the
screen of various sizes, locking, slide hidden.
- Insert: It is for importing objects such as adding
slides, adding quizzes, animation slides, symbols, math formulas, and buttons.
- Modify: It is for changing the size of the display
or setting the position of the objects on the screen.
- Project: It is for changing the appearance variable
creation.
- Quiz: It is for creating various types of exam and
the configuration of the exam.
- Audio: It is for handling audio such as audio
importing and editing.
- Video: It is for video manipulation such as
importing video files and editing video files.
- Themes: It is for managing slide layouts such as
saving themes.
- Window: It is for enabling or disabling various
panels on the screen such as Timeline Filmstrip Effects and Properties.
2. Object
- Slides: For adding slides
- Themes: Foe selecting themes in various styles
- Text: For adding text in various formats
- Shapes: For adding various drawings that the program
has provided
- Object: For adding commands
- Interactions: For adding Interactions
- Media: For adding a variety of media, audio, video
clips, pictures, animations, symbols, etc.
- Record: For recording your own voice and editing it
- Save: For saving data files.
- Preview: For testing the display in various formats
such as show the entire project or show the current slide
- Publish: For publishing, exporting to use in various
formats
3. Panel Groups
- Properties is
the configuration of objects such as text, image, animation, sound, video, link
button, etc. The menu will change according to the currently selected object.
Which the program will automatically show the result of the adjustment
- Library is
a bar that combines various objects. That is on the screen here When we put
images, audio, or video on the work area. The program will automatically put it
in the Library if you want. It is possible to bring objects in the Library to
the working area and set new properties, thus saving because there is no need
to import new objects.
- Timing: For
setting the display of slides and objects, such as timing the playing time, and
adding effect.

ความคิดเห็น
แสดงความคิดเห็น